

Enable the Docket Navigator connector for a Claude organization and connect your individual Docket Navigator account.
Connect Docket Navigator to Claude to search Docket Navigator data, work with saved research, create and edit binders and alerts at your request, and open supporting material in Docket Navigator.
Docket Navigator is listed in the Claude Connectors Directory. Team and Enterprise organizations add it from the directory; each member then connects with their own Docket Navigator account.
Before you begin
Section titled “Before you begin”Confirm that:
- Docket Navigator Customer Support has activated Docket Navigator Connect for your group.
- Your group’s administrator has enabled the Claude connector from the AI & Integrations page.
- On Claude Team or Enterprise, a Claude Owner or Primary Owner can add connectors from the Connectors Directory for the organization.
- Each person connecting Claude has an active subscription in Docket Navigator to at least one library.
The setup has three parts. Your group’s administrator enables the Claude connector in Docket Navigator, a Claude administrator adds Docket Navigator from the Connectors Directory for the Claude organization, and each user connects their own account.
1. Enable Claude for your Docket Navigator group
Section titled “1. Enable Claude for your Docket Navigator group”A Docket Navigator group administrator must enable the Claude connector for the group.
- Sign in to Docket Navigator.
- Open AI & Integrations.
- Under Group settings, find Claude connector.
- Select On.
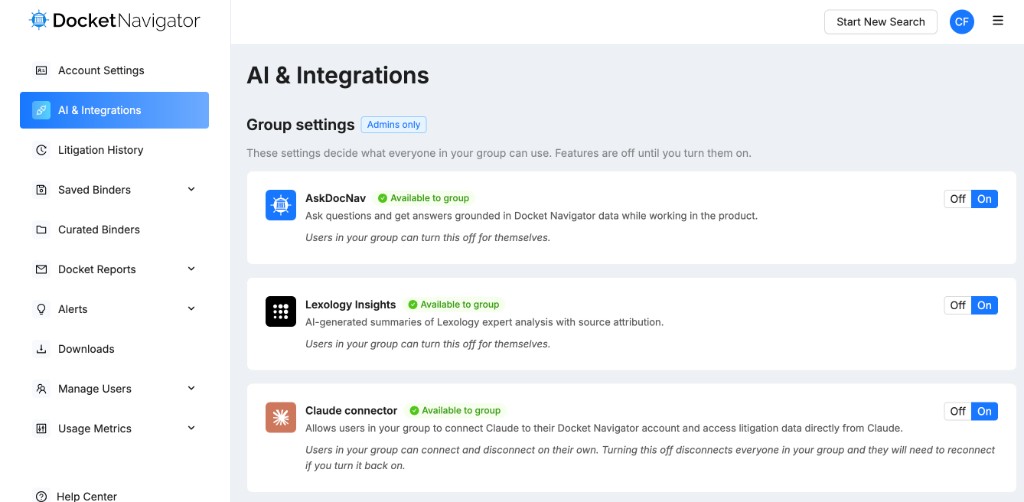
The Claude connector is now available to every member of the Docket Navigator group. Each member controls their own connection under Your settings.
2. Add Docket Navigator from the Connectors Directory
Section titled “2. Add Docket Navigator from the Connectors Directory”On Claude Team and Enterprise plans, an Owner or Primary Owner adds Docket Navigator for the organization before members can connect. On Enterprise, a member with a custom role that includes managing the organization’s libraries can also add it.
- Sign in to Claude as an Owner and select the organization from the account menu.
- Go to Organization settings > Connectors.
- Select + Add, then All available (or Browse connectors).
- Search for Docket Navigator.
- Select Add to your team.
Docket Navigator then appears in the organization’s connector list. Each member connects with their own Docket Navigator account.
On Claude Pro or Max, go to Customize > Connectors, select Add > Browse connectors, search for Docket Navigator, and select Connect. See Get started with connectors for plan-specific steps.
Team plan members who can’t add connectors see a Request button on the listing, which notifies the org’s Owners. See the Connectors Directory documentation for how requests work.
3. Connect your Docket Navigator account
Section titled “3. Connect your Docket Navigator account”After Docket Navigator has been added to the Claude organization, each user connects individually.
- Make sure you are working in the appropriate Claude organization.
- Select Customize in the Claude sidebar.
- Select Connectors.
- Find Docket Navigator in the connector list.
- Select Connect.
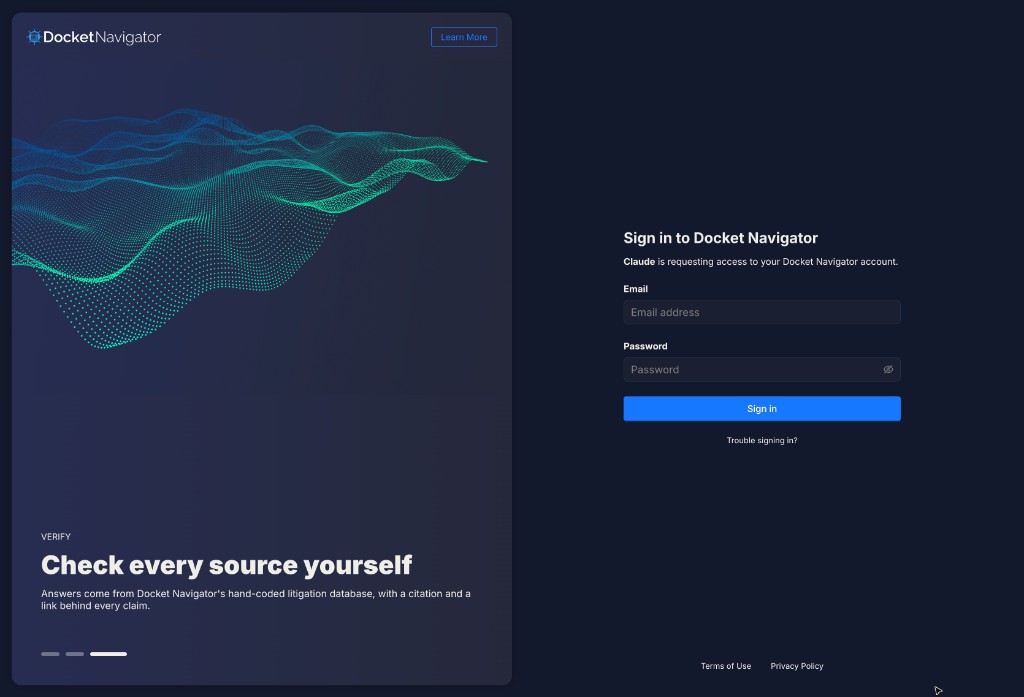
- Sign in with your Docket Navigator account when prompted.
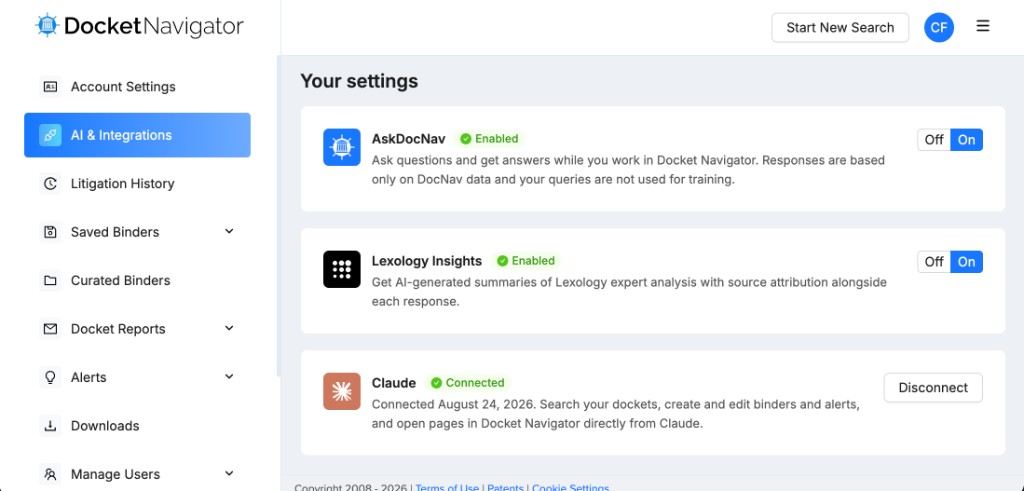
If your group administrator has enabled the Claude connector, you can view and manage your individual connection in Docket Navigator. On AI & Integrations, open Your settings. The card labeled Claude shows whether your account is connected and when the connection was made. Select Disconnect on that card to revoke the connection from Docket Navigator without changing the group-wide connector setting.
If you are already signed in to Docket Navigator, you may proceed directly to the consent screen.
4. Review and allow access
Section titled “4. Review and allow access”Docket Navigator displays the account being connected and the permissions Claude is requesting.
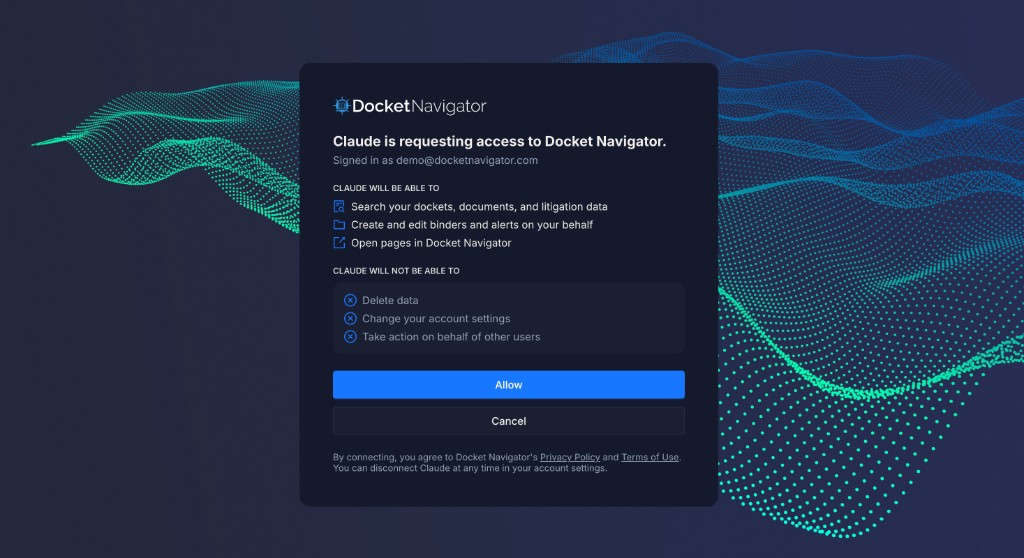
Claude will be able to:
- Search your dockets, documents, and litigation data.
- Create and edit binders and alerts on your behalf.
- Open pages in Docket Navigator.
Claude will be unable to:
- Delete data.
- Change your account settings.
- Take action on behalf of other users.
Confirm that the displayed email address is correct, review the permissions, and select Allow. Docket Navigator then returns you to Claude and confirms the connection in the browser.
Selecting Cancel ends the authorization process without connecting the account.
Install the Docket Navigator skill
Section titled “Install the Docket Navigator skill”After you connect the Docket Navigator MCP connector, Docket Navigator recommends installing the general-purpose Docket Navigator Claude skill. The connector exposes Docket Navigator tools to Claude; the skill teaches Claude how to use those tools efficiently and in Docket Navigator product terms.
The skill helps Claude:
- choose the right MCP tools with fewer redundant calls;
- keep binders, profiles, Document Types, Legal Issues, Motion Success, and outcomes distinct;
- plan and validate searches before opening binders or downloading filings;
- cite URLs and sources returned from Docket Navigator rather than inventing facts; and
- work across the libraries your account can access.
The skill complements the use-case skills on other MCP Help Center pages. Install it once per Claude user (or provision it for your organization) in addition to connecting the MCP connector.
Download the ZIP file below. It contains a docket-navigator folder with SKILL.md and supporting reference files—the structure Claude expects for a custom skill upload.
Add the skill in Claude
Section titled “Add the skill in Claude”- Download docket-navigator-skill.zip and confirm the archive contains a
docket-navigatorfolder withSKILL.mdinside it. - In Claude, select Customize in the sidebar.
- Select Skills.
- Select +, then Create skill, then Upload a skill.
- Upload docket-navigator-skill.zip.
- Turn the Docket Navigator skill On.
Keep the Docket Navigator connector enabled for the conversations where you want research against your account. Skills and connectors work together: the connector provides access; the skill provides procedure.
Use Docket Navigator in Claude
Section titled “Use Docket Navigator in Claude”After connecting, you can ask Claude to use Docket Navigator during a conversation. Claude may ask you to approve a Docket Navigator tool before it runs. Review the requested action before approving it, particularly when Claude proposes creating or editing a binder or alert.
Claude can also enable or disable connectors for an individual conversation. Select the + button beside the chat composer, select Connectors, and use the available connector controls.
Disconnect Claude
Section titled “Disconnect Claude”To disconnect your individual account from Docket Navigator:
- Open AI & Integrations in Docket Navigator.
- Under Your settings, open the card labeled Claude.
- Select Disconnect.
You can also manage the connection from Customize > Connectors in Claude.
A Docket Navigator group administrator can disable the Claude connector for the entire group from Group settings. This disconnects every member of the group and requires each member to reconnect if the integration is enabled again.
Troubleshooting
Section titled “Troubleshooting”Docket Navigator does not appear in Claude
Section titled “Docket Navigator does not appear in Claude”Confirm that you are working in the correct Claude organization and that a Claude Owner or Primary Owner has added Docket Navigator from the Connectors Directory under Organization settings > Connectors. On Team plans, members who cannot add connectors may need to use Request and wait for an Owner to enable it.
You still have a beta custom connector
Section titled “You still have a beta custom connector”If your organization added Docket Navigator during the beta as a Custom > Web connector, that connection can keep working. To use the directory listing instead, remove the old custom connector from Organization settings > Connectors (or Customize > Connectors on individual plans), then add Docket Navigator from the Connectors Directory and reconnect your account.
Claude cannot access Docket Navigator
Section titled “Claude cannot access Docket Navigator”Confirm that the Claude connector is turned on under the Docket Navigator group’s AI & Integrations settings and that your individual Docket Navigator connection is active.
You were disconnected after previously connecting
Section titled “You were disconnected after previously connecting”A Docket Navigator group administrator may have disabled the Claude connector. After the administrator enables it again, return to Customize > Connectors in Claude and reconnect your account.